Sunday, October 23, 2016

Mt. Talomo, Our First Conquest


Gathering information from various internet sources (with due respect to the writers/bloggers), Mt. Talomo is a mountain in the Davao Region, adjacent mountain to Mt. Apo, and has an elevation of 2.670+ meters above sea level. It is ranked within the top 12 mountains in the Philippines. Accordingly, in "Pinoy Mountainer", the mountain is classified with a difficulty level of 7/9, the same level with Mt. Apo and Mt. Pulag.

It will take you two days for the ascent and descent, depending on the weather and the frequency of breaks/rest times. The frequency will depend on the physical fitness of the mountaineer. Also, it will take time if the trail is muddy. 

The trail will entail passing through fields and forests with mossy and muddy trails. In the ascent, you will have to rely in gripping tree trunks, sturdy branches and roots. Hence, it is important to wear construction gloves. It could be tricky in choosing branches to hold since some of them are frail branches while some are deceivingly strong, but in fact merely fallen or cut branches, hence unattached to any tree. The choice of branches to hold on is important, or you will find yourself at the bottom of a ravine. Good body coordination and balance are keys in passing fallen mossy trunks.

Reaching the summit is victory itself. A reward for walking nearly ten hours and climbing almost an elevation of 2,670+ meters. You really have to enjoy the view and experience the natural situation at the top of the mountain, before starting the treacherous descent.

While it may look easy for the ascent, the descent is very difficult since you are descending with gravity. It is very tricky to look for a foot stop to hold your momentum, and it is doubly difficult if the trail is muddy. Sometimes, you have to crawl the fallen trunks to get down from a certain level.

Because of the previous night rain which made the trail muddy, and having nightfall caught up with our hike, it took us more than twelve hours, with total darkness, to reach Mt. Sicao Village.

But nothing will beat the experience in scaling Mt. Talomo, specially for us, our first climb ever.

The Preparation

We beg for your indulgence with this detailed preparation. It took almost six months to prepare for this climb, taking to account the mid-year semestral break. Mostly, constant search in the internet aided us in our preparation.

Our original plan was to scale Mt. Apo. Unfortunately, government closed the mountain indefinitely because of forest fires. Second choice, Mt. Matutum, but the same result as Mt. Apo.

A contact with http://www.mtapoadventures.com/ through Eng. Albert C. Gabriel, an alternative he suggested would either be Mt. Kitanglad and Mt.Dulang-dulang Traverse Trekking or Mt. Talomo. After mentioning that this was our first climb, Albert recommended Mt. Talomo.

We really had no idea what to expect with the Mt. Talomo climb, so we had to rely on internet searches and inquiries with Albert.

Preparation started by procuring footwear, apparel, and gears. Hence, we bought:

MUST-BUY items:

1) Gore-Tex Hiking Shoes (Merrell) which we bought on-line to avail of discount-vouchers. These shoes kept our feet dry through out the hike despite heavy rains and mud trails;

2) Jacket- water-proof with fleece (The North Face). The rain did not penetrate our jackets, while the fleece kept us warm from the 4-degree centigrade temperature in the summit;

3) Bonnet /head gear - As mentioned, you have to have this item because of the cold climate;
4) Thermal Underwear (Bench) - to keep you warm during the night;
5) Construction gloves with rubber coating - sure grip for branches and roots;
6) Raincoat/poncho, because of potential heavy rain, which did happen;
7) Waterproof Back Pack, to be doubly sure, we lined it with garbage disposal bags;
8) Trek Pants (Conquer) - to protect you from scratches from branches and thorny plants;
9) Dry Fit Shirts - you will sweat a lot, and cotton wear will make you heavier; and
10) Flashlight - there are no lights up there, I bought from Lazada one with a big battery that lasted for hours.

FIRST AID:

You will have to stock these items, just like what we brought:

MEDICINES: Make sure that you label each kind and placed individually in ziplocks:
  1. Analgesic (Mefenamic Acid) – for pain and headache;
  2. Antidiarrheal (Loperamide) – for diarrhea; not advisable when you’re at home but is useful during hiking trips when you do not have the time to relieve your bowel;
  3. Antihistamine (Dipphenhydramine/Loratadine) – for itchness, allergic reactions such as hives “pantal-pantal”. Careful though, drowsiness is a common side effect of this drug class;
  4. Decongestant (Phenyephrine / Phenypropanolamine) – may be of some benefit with colds that can be caused by high altitude and cold temperatures;
  5. Antihistamine (Dipphenhydramine/Loratadine) – for itchness, allergic reactions such as hives “pantal-pantal”. Careful though, drowsiness is a common side effect of this drug class.

TOPICAL:
  1. Sunscreen – Sun creams with SPF15 or higher aren’t just for people who don’t want to get dark; they are medically advisable because they protect the skin from UV rays, not only preventing acute conditions such as sunburns but also long-term complications such as, possibly, skin cancer with prolonged exposure.
  2. Insect repellant – This is very useful. Lower elevations would usually have common mosquitoes which can be more than a nuisance when they’re in great number. Some hikers also report that repellants like Off lotion can also protect against limatik. 
  3. Calamine lotion – This is useful for itchiness and insect bites, as well as exposure to poison ivy (lipa).
  4. Betadine – disinfectant, in case of wounds; otherwise plain soap and water will do.
OTHERS:
  1. Adhesive tape (Leukoplast)
  2. Adhesive strips (Band-Aid)
  3. Bandage – may be used to support sprains and fractures


Just before the Hike

Arriving at Davao City, we proceeded to the designated hotel (it comes with the climb-package). Albert met us the night before for a briefing. 

The next day, at 4AM, we were fetched at the hotel by our guide, Roy.

We took a cab to Calinan, Davao City, and Roy bought our food at
the nearby market.


 A 30-minute motorcycle ride within Calinan at a place were our hike begun. But first, breakfast...

...and some hybrid Durian. 

And the hike begins...


Mt. Sicao Village

We start our 2-hour hike to Mt. Sicao Village, Tamayong, Calinan.


 Mt. Talomo is at the background. 
A photo-op with our porters.

 Halfway, we had to traverse a banana plantation.


Fortunately, because I offered eggs to avoid a rainy trek,
the river was empty of water.


Finally, after a 2-hour hike, Mt. Sicao Village.

The Village is an important stop- to pay the permits and to seek permission from the elders to climb the mountain. It also the last stop for water. After a brief rest, the grueling 8 to 10 hour trek begins.


The Start of the Grueling Trek

And our trek begins:


 Would you believe, Kibol the dog accompanied us up to the top.


Our first stop near burnt cut trees


Brownies for trail food, the best energy-packed snack !


Deep Inside the Trail

After the break, the assent continues deep into the mountain trail


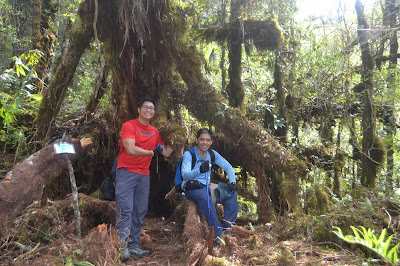
 Moss everywhere...


 Yes, trees as trail...


Unfortunately, three-fourths to the summit, rain caught us.
So, we had to camp and stay for the night. 
It was very chilly that night, so we had to layer ourselves.